Wednesday, September 4, 2019

Caffeine Fuled Paper Play... Tribute to Craftin Desert Divas

Hello everyone

First of all I would like to Thanks Lisa Bzibziak for inviting me to join  her Caffeine Fueled Paper Play Challenge over Coffee Loving Cardmakers blog and pay tribute to my dearest Craftin Desert Divas' stamp company (CDD) which sadly closed down at end of August. 

Be sure to check out Coffee Loveing Cardmakers blog post for more details how to win some awesome prizes.  As we honor to CDD so the prizes will be CDD goodies.  Extra chance if you're using CDD coffee, tea or cacao images.

Caffeine Fuled Paper Play Challenge

As you may know Tara Bruening is the owner of Craftin Desert Divas' stamp company. She's one of the sweetest, kindest and strongest women I ever know.  I came across CDD in 2015 through Instagram and fall in love with those cutie monsters and fun stamp designs ever since.

As a newbie, Tara gave me an opportunity to be under her design team for CDD since 2016 and I was so excited and at the same time worried since it's my 1st being a design team member.  I remembered I spent many hours learning how to establish my blog and FaceBook fan page.  She always tried to make her each and every release fun and engaged with customers.  We had FB hop as well as blog hop.  And when my 1st blog post went live I stayed up late to make sure that everything was right. *lol*

Over the past 4 years, I've grown up and learnt so much from her and CDD. The stamps designs got better and better in each release so as our relationship.  Even CDD shop is gone but Tara and CDD stamps will always be dear to my heart.  I wish her all the best and success in anything she wishes for.

So I crated these 2 cards to honor Craftin Desert Divas' and my friend Tara.  And of course I used CDD stamps, dies and stencils.


First, the darling mouse from "Love Your Mug" stamp and decorative edges with Daisy Border dies


Second card, with the adorable mushroom coffee shop and an cutie troll are from "Coffee Trolls" stamp set and border frame is Fancy Frame dies.  Background scene with "Blooming Tree" and "Hill Scene 2" (clouds) stencils


I hope you like them and as much as I do.  I also hope you play along with the Caffeine Fueled Paper Play Challenge and win some CDD goodies which are now can't find anywhere else.  Good Luck everyone.  

And once again Lisa, Thanks for having me.

Much Love,
Jan

Saturday, June 1, 2019

June CDD Creative Inspiration


Welcome to our June Creative Inspiration. 
Jan's here from handcrafthobby with you today on CDD blog

Starting of each month we are challenging you to share your #cddcreativeinspiration projects with us on social media.  We would love to have you join us by creating a project with the same theme showcasing CDD products.  Be sure to use hash tag #cddcreativeinspiration to join in.

At the end of each month we will announce a Instagram winner and CDD FB Gallery winner and we must have at least 5 entries for winners to be drawn

So what are you waiting for?  Click here to join our CDD Facebook Gallery Group.

For June, we have fun theme for you to play along and it's super easy.

"Cute Critters"

 Here is what I made for you.

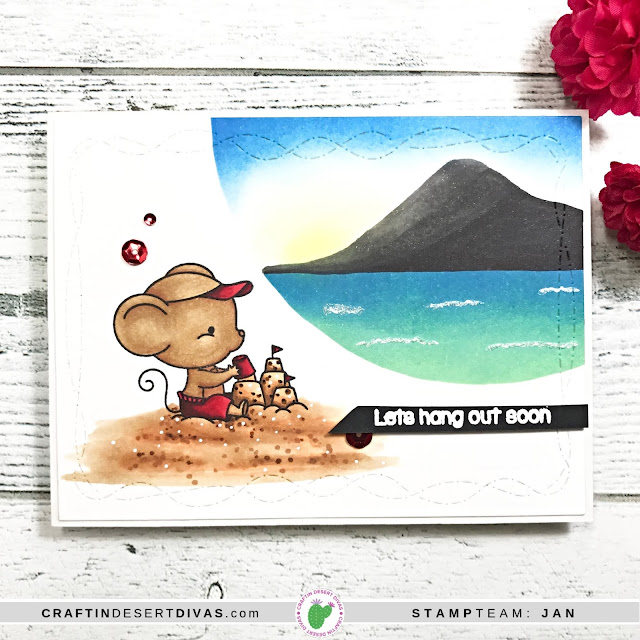
It's a simple card and easy to do background.  In this card I used the adorable mouse from Waving Hello stamp set and sentiment is from Harvest Happiness stamp.  Decorative frame is Crazy Stitched Frame dies.  
And here is how I made it.


Find any round object around you or you can use circle die but for my convenience I just grabbed the circle bow that I put small little images when I do fussy cutting.  I don't have big piece of masking paper so I used typing paper.


I wrapped around my white card base using partial area of the negative circle space.  I used distress oxide in squeezed lemonade for the sun, salty ocean for the sky and combination of salty ocean and cracked pistachio for the sea.   Look not so pretty right? :)


I stamped the mouse image outside the circle and began to color him.

Mouse - E31, E33
Hat, Short and Cup - R35, R29, R89
Sand - E53, E55, E57, E31


I used gray shade markers T5, T7, T9 and 100 to fill in the gap between the sky and sea.  On the left side of the mountain I used T5 since it's nearer to the sun and darker shade of Ts markers when it's further away.

I cut my panel with Crazy Stitched Frame dies (my favorite) and heat embossed the sentiment with white embossing powder onto black card stock.


To finish up the card I used white gel pen for small waves at the sea and on the sand areas.  I also put light blue stickles on the waves for some sparkling.  I then used the red sequins from Berry Christmas sequins mix and attached them here and there.  
I hope you like it and decide to play along with us.

These are CDD products that I used in this card
Waving Hello stamp, Harvest Happiness stamp, Crazy Stitched Frame dies, Distress Oxide Inks,
Berry Christmas Sequins and White Gel pen

(Links are affiliate links which mean I'll earn some extra from CDD at NO EXTRA cost to you if you purchase CDD products from these links.... Thank you for your support)  

Our Design Team members will start sharing their #cddcreativeinspiration projects thru out the month.  Here are some of them.


Hope you'll join our fun!  Have a Wonderful day.
Jan

Wednesday, May 1, 2019

May CDD Creative Inspiration


Hello everyone and welcome back.  I am on Craftin Desert Divas' blog today sharing our new Creative Inspiration for May. 

Starting of each month we are challenging you to share your #cddcreativeinspiration projects with us on social media.  We would love to have you join us by creating a project with the same theme showcasing CDD products.  Be sure to use hash tag #cddcreativeinspiration to join in.  At the end of each month we will announce a Instagram winner and CDD FB Gallery winner.

So what are you waiting for?  Click here to join our CDD Facebook Gallery Group.

So let's get started shall we.  For May we have fun theme for you to play along.

"Thankful For Spring"

 Let's me share what I made for you.


I created this card with Hello Beautiful stamp, Hello die from Hill Sentiment dies, word "SPRING" from Stitched Alphabet dies and puffy clouds from Hill Scene 2 stencil.


I cut the Hello die from watercolor paper toward to top and heat embossed with white embossing powder the flowers stamp onto my panel.


Onto another white panel, I used the puffy clouds stencil to create the sky background with distress oxide ink in salty ocean. 


I decided to use peerless water colors since it's been so long from my last use and I do love the vibrant colors from it.


And this was the hard part *lol* to cut the word "SPRING" onto of the colored panel.  I also cut few more sets of the word from white card stock and stacked them up for dimension.


I attached the colored panel onto the sky background.  To make the word Hello standing out I used copic marker W3 and W1 for shading on the left side of the letters.  I also used Nuvo Glitter Accent onto of the die cut words.  I know it makes the colored flowers abit blurry but I can live with it in exchange of the shinny or you can use glossy accent as well. 

I hope you like it. Here is a closer look one more time.


These are CDD products that I used in this card
Hello Beautiful stamp, Hill Sentiment dies, Stitched Alphabet dies, Hill Scene 2 stencil, Distress Oxide Ink, Nuvo Glitter Accents.

Our Design Team members will start sharing their #cddcreativeinspiration projects thru out the month. Here are some of them.


Hope you'll join our fun!  Have a Wonderful day.
Jan

(Links are affiliate links which mean I'll earn some extra from CDD at NO EXTRA cost to you if you purchase CDD products from these links.... Thank you for your support) 

Monday, April 1, 2019

CDD April Creative Inspiration


Hello everyone. 
I'm so happy to be on Crafin Desert Divas blog again today sharing my card for our brand new CDD Creative Inspiration.
First of all, Congratulation to our March #cddcreativeinspiration winner.

Starting of each month we are challenging you to share your #cddcreativeinspiration projects with us on social media.  We would love to have you join us by creating a project with the same theme showcasing CDD products.  Be sure to use hash tag #cddcreativeinspiration to join in.  At the end of each month we will announce a Instagram winner and CDD FB Gallery winner.

So what are you waiting for?  Click here to join our CDD Facebook Gallery Group.

So let's get started shall we.  For April we have fun theme for you to play along.

"Unicorn and/or Fairy with Rainbow Palette"

Here is what I created for you.


It's a sweet clean and simple card I made with Make A Wish and Magical Unicorns stamps.


I began with using Cloudy Sky stencil with Distress Oxide ink in broken china and ink duster.


I cut our Pop Up Rainbow die from white card stock and colored them in rainbow color order with copic markers.


I stamped the unicorn from Magical Wishes stamp and the fairy from Make A Wish stamp and colored them with copic markers as well.


I then cut the background panel with Crazy Stitched Frame dies and fussy cut my 2 colored images.  For sentiment, I used Flag Banner dies and All Together Sentiments stamp.


Here is the finished card again after assemble them all together and attached it onto red card base.
 I hope you like it.  

Here are CDD products that I used in this card

(Links are affiliate links which mean I'll earn some extra from CDD at NO EXTRA cost to you if you purchase CDD products from these links.... Thank you for your support)

Our DT members will start sharing their #cddcreativeinspiration projects thru out the month and here is snippet from some of their projects.


Hope you will join in our fun!

And Have a great day.
Jan

Sunday, October 28, 2018

Coloring For Non-Colorers | Designer Creative Challenge

Hi... and Welcome back :)

I'm so happy to be back on Craftin Desert Divas' blog today.  For this week creative challenge, we have a fun theme : Coloring for Non-colorers for you.


I understand that not everyone enjoy coloring especially when you're just started crafting.  When you see those adorable images and you want to create cards but frustrated or no confident in coloring.  I created a short vdo sharing how you can make use of those images that you like and create a card or more without any coloring.


Here are so still photos for you


I stamped, inked the images with walnut stain distress ink and fussy cut them out.


Adding Nuvo Drops, Stickles or Liquid Pearls will make the images look more dimensional.


Using Stencils with distress inks or oxides inks for background.


Adding die cuts or small details with gel pen or glaze pen will create the life on the images and make your project looks more interesting.

I hope you enjoy my vdo and challenge yourself if you're one who enjoy coloring to create project without any coloring.  And those that coloring is not your cup of tea, please don't give up and give these techniques a try.  It's much easier than coloring I would say.

Thank you for stopping by and I wish you all a wonderful day and happy crafting.

Cheers,
Jan

Here are CDD products that I used in this card

Christmas Time stamp
Merry Florals stamp
Crazy Stitched Frame dies
Outdoor Landscape 2 dies
Hill Scene 2 stencil
Distress Oxide Inks
Nuvo Drops

(Links are affiliate links which mean I'll earn some extra from CDD at NO EXTRA cost to you if you purchase CDD products from these links.... Thank you for your support)

Sunday, October 14, 2018

One-layer Wonders | Craftin Desert Divas Designer Creative Challenge

Hi there folks..  I'm so happy to be back on Craftin Desert Divas blog sharing with you how I created multiple one-layer cards using masking with masking paper/post-it paper and stencils.

I used Holiday Fairies stamp for all cards as main image.  Using both Magic Castle and Hill Scene 2 stencils to create background, hills as well as puffy clouds.  As for the frame, I love to use Torn Paper dies for decorative edges.  To make them look a bit different besides using various distress oxide inks, I also used different sentiments from Snow Day and Santa's Helpers stamps.


One-layer card can be very complex and required multiple maskings to layer objects on top of each others.  Or it can be easy and achievable for mass production.  I'm sharing with you a short vdo how I mass produced these one-layer cards.


Here are some screenshots of the processing while I created them.


Positioned both Magic Castle stencil and Hill Scene 2 stencil onto the desired area.  By secured the card panel to the surface as well as the stencils on top of the card stock will make sure that the stencils will not shifting when inking.


Flip the stencil for multiple uses as positive and negative areas.


When changing the ink color, always clean up the stencil with damp cloth or wet wipe so that the previous ink will not be transferred to your next project.

Here are all the finished 5 cards.  They're same design but different looks.  


And here are screen short for distress oxide inks and copic markers that I used in each card.


Skin : E11/50/93
Hair : E40/42/44
Wings : BG10/11/13
Sky : Distress Oxide - broken china
Hill : Distress Oxide - ice spruce

Top left - Distress Oxide : worn lipstick, Copic :  B95/97/99
Top right - Distress Oxide : carved pumpkin, Copic : BG11/45/49
Center - Distress Oxide : wilted violet, Copic : YG 21/23/17
Bottom left - Distress Oxide : cracked pistachio, Copic : RV52/23/25
Bottom right - Distress Oxide : squeezed lemonade, Copic : R24/37/59

One-layer card is my favorite card technique.  I love fussy cut paper and do masking.  I hope you enjoy the vdo and give it a try and who knows... you might love it too!

Thank you for stopping by and have an awesome day.

Cheers,
Jan


Here are CDD products that I used in these cards

Holidays Fairies stamp
Snow Day stamp
Santa's Helpers stamp
Torn Paper dies
Magic Castle stencil
Hill Scene 2 stencil
Distress Oxide Inks

Thursday, October 4, 2018

Dry And Heat Embossing With Stencil

Hello everyone

Welcome back :) I'm on Craftin Desert Divas blog today and I have some fun techniques to share with you using stencil for Dry and Heat Embossing.


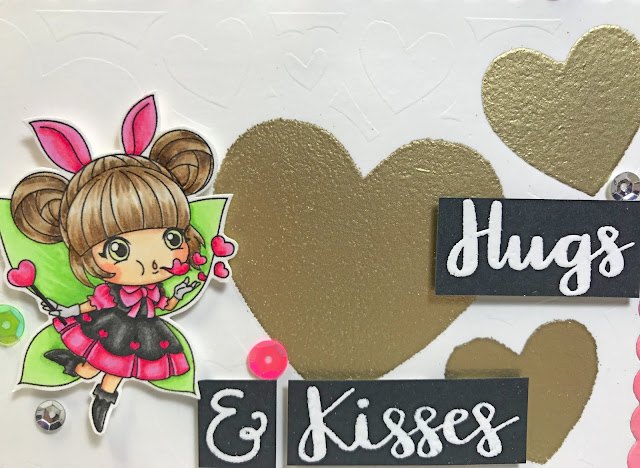
Here are some great ways to use stencil that you have and create a soft and textured background with Dry and Heat Embossing Techniques.  In this card, I created both dry and heat embossing techniques with Heart Galore stencil.


First I cut my panel with Inside Scalloped Rectangle dies.  Using the inner frame, I positioned and secured my card base to the stencil with some washi tapes. 

Tip : attach the washi tape behind the card stock so that the front panel will be fully embossed.


Here is my sandwich for big short machine.  Multipurpose platform on TAB 1 + 1 clear cutting plate + my stencil with card stock + tan embossing mat + 1 clear cutting plate. 

Tip : Depending on each cutting machine, you might need to put extra card stock for more pressure.  You need to follow your machine's manufacture instruction for embossing sandwich.


Here's what mine look like.


I wanted to highlight some hearts on my panel so I decided to do heat embossing on certain hearts by putting back the stencil on the same position as before and masking the surrounding area with some post-it tape.  I then applied VersaMark ink onto the open area.

Tip : Do not twist the ink pad.  Just pressed it firmly up and down.  This is because it might move the stencil and the impression will not be the same position as the dry embossed area.


I removed the stencil carefully and poured gold embossing powder over the inked area.

Tip : Always use anti static power tool before inking.  Use paint brush to remove unwanted powder and if there is small area use Quick Pick tool or Pick Me Up tool to pick it away.  Preheat your heat gun to minimize uneven card stock from the heat.


I attached the panel back to its frame and began coloring this little cutie fairy from Holiday Fairy stamp with copic markers as well as white heat embossed the sentiment from Sending Sentiment stamp.


And here is a close up look once it's done. I also sprinkled some sequins here and there for little finishing touch.  I do hope you like it and give these techniques a try. 

Thank you.

Hugs,

Jan

 (Links are affiliate links which mean I'll earn some extra from CDD at NO EXTRA cost to you if you purchase CDD products from these links.... Thank you for your support)