Sunday, June 25, 2017

Magical Birthday Wishes

Hello there crafty friends...

I am back to share with you my project for Craftin Desert Divas Social Media Monthly Mood Board Challenge for June and I'd like to invite you all to join us.  There still got time to join us for some prizes....

Here is June Mood Board Inspiration Photo

Click here to join us at CDD gallery to enter the challenge.


Here is what I made for you
I love this mood board photo inspiration.  It's so sweet and yummy pastel colors.  I began by dropping in clear water at the center of my water color panel randomly and followed by Distress Oxide Inks in Broken China, Cracked Pistachio and Worn Lipstick.  Let it dried and cut the panel with Crazy Stitched Frame dies.


From white cardstock I stamped this adorable rain critter from Stars and Wishes stamp and colored him with copic markers.  I fussy cut him out but without the rain drops and used stickle to make some sparkle at the cloud.  I poped him up with some form tape and stamped the sentiment word "Sending" from Wishful Thoughts and combine with sentiment "Magical Birthday Wishes" from Magical Wishes stamp.  I finished it off by dropping Nuvo Crystal Drop in Apple Green and Caribbean Ocean.  And it's done!

I do hope you like it and Thank You for stopping by today.

Hugs,
Jan

(Links are affiliate links which mean I'll earn some money from CDD at NO EXTRA cost to you if you purchase from these links.... Thank you)


Here are CDD produts that I used
Stars and Wishes

Magical Wishes

Wishful Thoughts

Crazy Stitched Frames

Apple Green

Caribeen Ocean 
Broken China

Cracked Pistachio

Worn Lipstick

Sunday, June 11, 2017

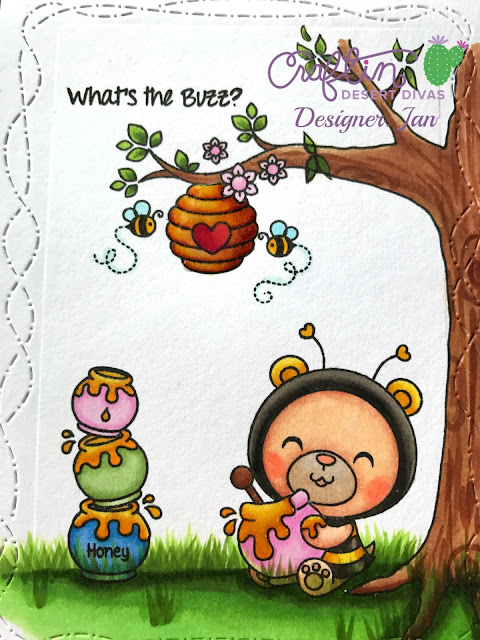
What's The Buzz?

Hello there my crafty friends,

I am so Glad to be on Craftin Desert Divas' Blog today to encouraging you to join us for our June Social Media Monthly Mood Board Challenge over CDD gallery.

Here is our Mood Board Inspiration photo.
Click here to join us at CDD gallery to enter the challenge.

Here is what I made for you.

I love this mood board inspiration photo... The colors theme is so sweet so I colored the trio honey pots as per the color theme.

It's a one layer card but I don't have to do any masking or fussy cutting for that *Yeah* :) I stamped the bee bear and the trio honey pots from Sweet As Honey stamp toward the bottom of my panel.  I knew that I wanted to put the bee hive at the top but I didn't want it to be closed at the edge so I stamped the bee hive at the top center of my panel and handdrawn the tree trunk and the branch extended from to the bee hive.


There was the line at the connection of the bee hive and my tree branch so I covered it up by drawing extra leaves to cove that line.

I colored all image with my usual medium copic markers including the grass ground.  I then cut my main panel with Crazy Stitched Frame dies and stamped the sentiment at the top.  I decided not to put any Nuvo drops here so I used Glossy Accent at the bee hive.  And my card was done!

Thank you for stopping by today and wishing you all wonderful day!

Hugs,
Jan

(Links are affiliate links which mean I'll earn some money from CDD at NO EXTRA cost to you if you purchase from these links.... Thank you)
 
Here are CDD products that I used.
Sweet As Honey
Crazy Stitched Frame
Glossy Accent

Thursday, June 1, 2017

Sending Bugs and Kisses

Hello Crafty friends,

I am super excited to be back on Craftin Desert Divas' Blog again for today.  And I have a project to share with you.

And here is what I made

I love this cutie pie from Ladybug Garden stamp.  Love the position that she is sending the flower away as if she is sending Bugs (Hugs) and Kisses.

Here is how I made,  I first cut my main panel from white card stock using Crazy Stitched Frame dies.  I stamped the ladybug image onto white card stock, colored it with copic markers and fussy cut it out.  I know that I wanted to make her stand on the stump to give some interest.  So I used the stump die cut from Scene Builder dies with light and dark grey texture card stocks.  I positioned her onto the stump and stamped the flowers onto the card base itself toward the right.


I wanted to hi light the word Sending so I used the Sending word from Wishful Thought stamp and partially stamped the words Bugs and Kisses underneath it.  I then adhered the stump directly onto card based and popped the ladybug up with form tape.  I created my grass ground with some green copic markers using flicking technique.

Then I felt the sky was abit plain so I had the option to do as I usually did with my card with sky stencil but I wanted to make it abit different so I diecut the cloud die from Scene Builder dies as well with light blue textured card stock and adhered onto my card base.  I also used Glossy Accent onto the ladybug's wings.

I hope you like what I made and Thank you for stopping by.  Have a Wonderful day.

Hugs,
Jan

(Links are affiliate links which mean I'll earn some money from CDD at NO EXTRA cost to you if you purchase from these links.... Thank you)
 

Here are CDD products that I used
Ladybug Garden

Wishful Thoughts
Crazy Stitched Frame
Scene Builder
Glossy Accent