Sunday, October 28, 2018

Coloring For Non-Colorers | Designer Creative Challenge

Hi... and Welcome back :)

I'm so happy to be back on Craftin Desert Divas' blog today.  For this week creative challenge, we have a fun theme : Coloring for Non-colorers for you.


I understand that not everyone enjoy coloring especially when you're just started crafting.  When you see those adorable images and you want to create cards but frustrated or no confident in coloring.  I created a short vdo sharing how you can make use of those images that you like and create a card or more without any coloring.


Here are so still photos for you


I stamped, inked the images with walnut stain distress ink and fussy cut them out.


Adding Nuvo Drops, Stickles or Liquid Pearls will make the images look more dimensional.


Using Stencils with distress inks or oxides inks for background.


Adding die cuts or small details with gel pen or glaze pen will create the life on the images and make your project looks more interesting.

I hope you enjoy my vdo and challenge yourself if you're one who enjoy coloring to create project without any coloring.  And those that coloring is not your cup of tea, please don't give up and give these techniques a try.  It's much easier than coloring I would say.

Thank you for stopping by and I wish you all a wonderful day and happy crafting.

Cheers,
Jan

Here are CDD products that I used in this card

Christmas Time stamp
Merry Florals stamp
Crazy Stitched Frame dies
Outdoor Landscape 2 dies
Hill Scene 2 stencil
Distress Oxide Inks
Nuvo Drops

(Links are affiliate links which mean I'll earn some extra from CDD at NO EXTRA cost to you if you purchase CDD products from these links.... Thank you for your support)

Sunday, October 14, 2018

One-layer Wonders | Craftin Desert Divas Designer Creative Challenge

Hi there folks..  I'm so happy to be back on Craftin Desert Divas blog sharing with you how I created multiple one-layer cards using masking with masking paper/post-it paper and stencils.

I used Holiday Fairies stamp for all cards as main image.  Using both Magic Castle and Hill Scene 2 stencils to create background, hills as well as puffy clouds.  As for the frame, I love to use Torn Paper dies for decorative edges.  To make them look a bit different besides using various distress oxide inks, I also used different sentiments from Snow Day and Santa's Helpers stamps.


One-layer card can be very complex and required multiple maskings to layer objects on top of each others.  Or it can be easy and achievable for mass production.  I'm sharing with you a short vdo how I mass produced these one-layer cards.


Here are some screenshots of the processing while I created them.


Positioned both Magic Castle stencil and Hill Scene 2 stencil onto the desired area.  By secured the card panel to the surface as well as the stencils on top of the card stock will make sure that the stencils will not shifting when inking.


Flip the stencil for multiple uses as positive and negative areas.


When changing the ink color, always clean up the stencil with damp cloth or wet wipe so that the previous ink will not be transferred to your next project.

Here are all the finished 5 cards.  They're same design but different looks.  


And here are screen short for distress oxide inks and copic markers that I used in each card.


Skin : E11/50/93
Hair : E40/42/44
Wings : BG10/11/13
Sky : Distress Oxide - broken china
Hill : Distress Oxide - ice spruce

Top left - Distress Oxide : worn lipstick, Copic :  B95/97/99
Top right - Distress Oxide : carved pumpkin, Copic : BG11/45/49
Center - Distress Oxide : wilted violet, Copic : YG 21/23/17
Bottom left - Distress Oxide : cracked pistachio, Copic : RV52/23/25
Bottom right - Distress Oxide : squeezed lemonade, Copic : R24/37/59

One-layer card is my favorite card technique.  I love fussy cut paper and do masking.  I hope you enjoy the vdo and give it a try and who knows... you might love it too!

Thank you for stopping by and have an awesome day.

Cheers,
Jan


Here are CDD products that I used in these cards

Holidays Fairies stamp
Snow Day stamp
Santa's Helpers stamp
Torn Paper dies
Magic Castle stencil
Hill Scene 2 stencil
Distress Oxide Inks

Thursday, October 4, 2018

Dry And Heat Embossing With Stencil

Hello everyone

Welcome back :) I'm on Craftin Desert Divas blog today and I have some fun techniques to share with you using stencil for Dry and Heat Embossing.


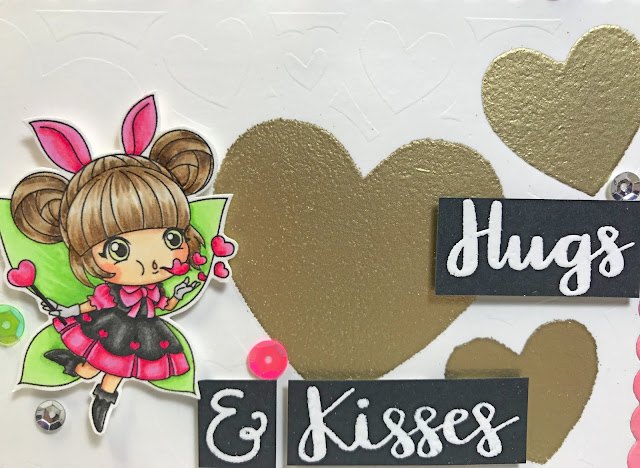
Here are some great ways to use stencil that you have and create a soft and textured background with Dry and Heat Embossing Techniques.  In this card, I created both dry and heat embossing techniques with Heart Galore stencil.


First I cut my panel with Inside Scalloped Rectangle dies.  Using the inner frame, I positioned and secured my card base to the stencil with some washi tapes. 

Tip : attach the washi tape behind the card stock so that the front panel will be fully embossed.


Here is my sandwich for big short machine.  Multipurpose platform on TAB 1 + 1 clear cutting plate + my stencil with card stock + tan embossing mat + 1 clear cutting plate. 

Tip : Depending on each cutting machine, you might need to put extra card stock for more pressure.  You need to follow your machine's manufacture instruction for embossing sandwich.


Here's what mine look like.


I wanted to highlight some hearts on my panel so I decided to do heat embossing on certain hearts by putting back the stencil on the same position as before and masking the surrounding area with some post-it tape.  I then applied VersaMark ink onto the open area.

Tip : Do not twist the ink pad.  Just pressed it firmly up and down.  This is because it might move the stencil and the impression will not be the same position as the dry embossed area.


I removed the stencil carefully and poured gold embossing powder over the inked area.

Tip : Always use anti static power tool before inking.  Use paint brush to remove unwanted powder and if there is small area use Quick Pick tool or Pick Me Up tool to pick it away.  Preheat your heat gun to minimize uneven card stock from the heat.


I attached the panel back to its frame and began coloring this little cutie fairy from Holiday Fairy stamp with copic markers as well as white heat embossed the sentiment from Sending Sentiment stamp.


And here is a close up look once it's done. I also sprinkled some sequins here and there for little finishing touch.  I do hope you like it and give these techniques a try. 

Thank you.

Hugs,

Jan

 (Links are affiliate links which mean I'll earn some extra from CDD at NO EXTRA cost to you if you purchase CDD products from these links.... Thank you for your support)