Showing posts with label Linky Party. Show all posts

Monday, August 15, 2016

CDD Linky Party - Watercolor : Hey! How are you?


Hello friends! The theme for this Linky Party at Craftin Desert Divas is "Watercolor"! We would love to see all of your projects that fit this theme! So go ahead and craft it and link it up on the Craftin Desert Diva's Blog.

Every other Monday will mark the beginning of a new semi-weekly Linky Party over 
at the CDD blog. We hope you will share your projects with us! And don't forget 
about  the prizes! Every Linky Party will have a winner and a Top 3! 
The more times you link up...the more chances you have to win!!

Our Sponsors for this Linky Party are:

One 4"x 6" stamp set
One Digi Stamp of choice
Here is what I made..

I was once afraid of watercoloring but now I enjoy doing it so much... it's so forgiving and I encourage you to try!

There are so many watercolor mediums in the market nowadays.  For my card I used distress inks reinkers with wet on wet technique which mean I wet the watercolor paper first and then dropped in the colors ramdomly and let the colors do their job.  I choose reinkers because they're more concentrated and vibrant. But if you have only ink pads, they will do the same thing just that colors might not be so bright.

After I let the watercolor panel dried overnight or you can used heat tool to speed up the process, I used Fancy Stitched Lable dies (2nd one from the largest) to cut my panel and mounted onto thin black layering color.  I also stamped the rabbit from Peek A Boo Animals stamp and colored her with inktense watercolor pencils.  I stamped her twice.  One I colored her as per normal and another one I only colored on her paws.

I then fussy cut the paws out.  For the main rabbit I used the same Fancy Stitched Lable dies to cut her out at the bottom part and fussy cut her out the rest of the area.  I attached the rabbit directly to the panel.  Once I had the position of the rabbit I then stamped the sentiment.

I prepared my card base by using the frame dies from Picture Frame Dies and cut it twice from black card stock and attached them together.  Then I adhered the watercolor panel on top.  For the center panel I put on form tape to pop it up.  For the paws I double the form tape to give more dimension.  I also sprinkle the Lily White Sprinkle near to the sentiment and to accent my card.

Here's the closer look

Hope you like it and give it a try. Have a Wonderful Day!

Here are all the CDD products I used:
Peek A Boo Animals

Picture Frame Dies

Fancy Stitched Label Dies

Lily White Sprinkles

Monday, August 1, 2016

Back To School Photo Inspiration


Hello friends! The theme for this Linky Party at Craftin Desert Divas is "Photo Inspiration"! We would love to see all of your projects that fit this theme! So go ahead and craft it and link it up on the Craftin Desert Diva's Blog.

Every other Monday will mark the beginning of a new semi-weekly Linky Party over 
at the CDD blog. We hope you will share your projects with us! And don't forget 
about  the prizes! Every Linky Party will have a winner and a Top 3! 
The more times you link up...the more chances you have to win!!

Our Sponsors for this Linky Party are:

One 4"x 6" stamp set
One Digi Stamp of choice

Here is what I made..
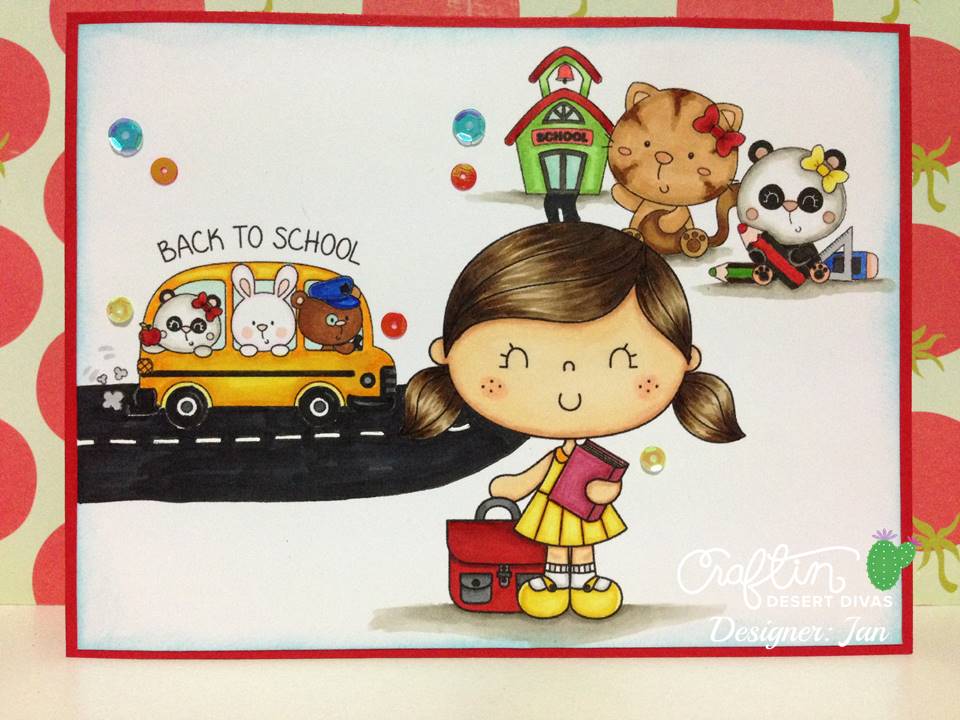
This card I used all digital images - School House Supplies.
And this is how I used Microsoft Powerpoint and Word to arrange the images :

1. I dragged & dropped "png" file to Microsoft PowerPoint and resize it to the size I want.  I used 4 digital images School Bus, School Girl, School House Cat and School Panda.

2. I arranged the position of the images by using the function at the tool bar, I chose "Format" and click "Bring Forward" or "Send Backward" to adjust the overlaping the images.

3. After I was happy with the arrangement, I then saved the slide to "jpg" file by clicking "Save As" option and saved it in jpg (not pptx file). 
4. I copied my jpg file to Microsoft Word and resized it fit my card base (in this case it's slightly smaller than A2 size) and printed it out.

I colored all images with various copic markers and attached to my card base.  I also sprinkled Star Power Sequins to embellish my card.

Here are the closer look


Thank you for stopping by and Have a Wonderful day!

Here are all the CDD products I used:
School Bus

School Girl

Monday, July 18, 2016

Wishing you were here with me!


Hello friends! The theme for this Linky Party at Craftin Desert Divas is "Beach"! We would love to see all of your projects that fit this theme! So go ahead and craft it and link it up on the Craftin Desert Diva's Blog.

Every other Monday will mark the beginning of a new semi-weekly Linky Party over 
at the CDD blog. We hope you will share your projects with us! And don't forget 
about  the prizes! Every Linky Party will have a winner and a Top 3! 
The more times you link up...the more chances you have to win!!

Our Sponsors for this Linky Party are:

One 4"x 6" stamp set
One Digi Stamp of choice
Here is what I made..
Today card is clean and simple and no masking *lol* 

I began by stampping the Coconut Tree from Island Paradise stamp on the left side of my white card stock panel.  I then stamped the coconut drink beside it.  I used mirror image stamping technique for the second coconut drink and colored them with various copic markers.  I also used copic markers to color the sand and sea.  To make the small waves where the water meet the sand I used white gel pen and dotted along the line.

I then did my cloud stencil and cut the panel by using Fancy Frame Dies and stamped the sentiment from Wishful Thoughts stamp set and attached the panel onto my craft card base.  It's done!

 Here are the closer look
Thank you so much for stopping by and I wish you all a Wonderful day!

Here are all the CDD products I used:
Island Paradise
Wishful Thoughts
Fancy Frame Dies


Monday, July 4, 2016

Good Morning Cup


Hello friends! The theme for this Linky Party at Craftin Desert Divas is "Coffee"! We would love to see all of your projects that fit this theme! So go ahead and craft it and link it up on the Craftin Desert Diva's Blog.

Every other Monday will mark the beginning of a new semi-weekly Linky Party over 
at the CDD blog. We hope you will share your projects with us! And don't forget 
about  the prizes! Every Linky Party will have a winner and a Top 3! 
The more times you link up...the more chances you have to win!!

Our Sponsors for this Linky Party are:

One 4"x 6" stamp set
One Digi Stamp of choice
Here is what I made..
I thought it would be fun to play around with the digial stamp for this project.  I was looking thru Craftin Desert Divas Digital stamps section and came across this Good Morning Cup digital stamp so I thought I would made it to be those classic chinas.. 

My way of doing digital stamp is simple. (I am very weak in technology and I don't have any editing software..) I downloaded the image and opened it with Windows Explorer to unzip my file. I then selected jpg image and used the editing tool (retouch) to alter/erase the wording inside the cup and saved it to the different file name.  I used crop option to crop out the wording, retouched it and also saved to another file.

Then I used Microsoft PowerPoint to size and arrange my image.  To make the saucer I used the oval shape and adjusted the size to fit my cup.  I then brought forward my cup image to the front and then again saved the image in jpg file. I opened my latest file in Microsoft Word, adjusted to the size that I wanted and printed it out onto my white card stock.  I used Fancy Frame Dies to cut the panel out.  

To make it looked like those classic chinas, I used the small rose image from Flowers In Bloom and stamped it at the center of the cup and masked it with postit note then stamped another one on each side of the center rose.  I also handdrawn the saucer base.  

I used black marker to fill in those words and colored the image by using various copic markers.  I also used gold and white gel pens to accent my cup and saucer.  I drawn the coffee steamers and attached my panel onto my blue card base.  To finish it off I used Star Sequins Blue and adhered them here and there and it's done!

And here are the closer look

Thank you for stopping by today! Have a Wonderful day!

Here are all the CDD products I used:

Good Morning Cup

Flowers In Bloom
Fancy Frame Dies

Star Sequins Blue


Monday, June 20, 2016

You're Souper


Hello friends! The theme for this Linky Party at Craftin Desert Divas is "Red, White & Blue"! We would love to see all of your projects that fit this theme! So go ahead and craft it and link it up on the Craftin Desert Diva's Blog.

Every other Monday will mark the beginning of a new semi-weekly Linky Party over 
at the CDD blog. We hope you will share your projects with us! And don't forget 
about  the prizes! Every Linky Party will have a winner and a Top 3! 
The more times you link up...the more chances you have to win!!

Our Sponsors for this Linky Party are:

One 4"x 6" stamp set
One Digi Stamp of choice

Here is what I made..

I began by cutting 2 pcs of red card stock from Picture Frame Die.  One of them I used Star Border from Across The Borders stamp and stamped repeatedly with versamark ink and heat set with clear embossing powder.  I then attached with another piece of red card stock and formed my card base.

I also cut the window panel from Picture Frame Die with blue card stock for my image, sentiment and the shaker window.  From white card stock I stamped the soup can image (from Kitchen Cuties) side by side and made sure they looked like they are holding hands and another can I stamped on top of them.  I colored them with various copic markers. Nothing fancy!

For the shaker window I stamped and embossed the same Star Border from Across The Borders stamp with red and blue embossing powders.  I also embossed the sentiment with blue glister embossing powder.  

I popped the blue window pannel with form tape.  At the shaker window I attached the acetate sheet and filled inside with Oh My Star and Twinkle Sequins.  I arranged my soup can image to the long window.  And the whole blue pannel I attached on another white layering card stock.  Then attached it to my red card base.  I then attached my sentiment to the smallest window and decorate 3 big stars at the top center of my blue panel.

Here are the closer look

Thank you for stopping by... Have a Wonderful Day!

Here are CDD products that I used
Kitchen Cuties

Across The Borders

Picture Frame Die


Oh My Stars Sequins

Twinkle Sequins